Dead bug exercise progressions are excellent for core stability and are used in physical therapy and rehab but often overlooked in fitness and athletics. We use them to develop core strength and pelvic positioning in a safe, supported posture. The dead bug progressions shown below don’t necessarily need to be performed in the order listed. Different people need different things, and this list is not comprehensive. It should be used as a starting point to give you a better idea of different things you can experiment with.
Dead Bug Progression Ground Rules
The dead bug is frequently used in rehabilitation to build core strength and stability. It also teaches you how to position your pelvis for better posture in your lower back. The optimal position to perform the dead bug in is with a neutral spine. This means that the normal curves of your spine are present but not exaggerated.
Neutral Spine vs. Posterior Pelvic Tilt
Generally, I recommend that most people learn the posterior pelvic tilt and practice it before performing many exercises, including dead bugs. This is because most people have a bias towards lower crossed syndrome, also known as an anterior pelvic tilt. In other words, their resting pelvic position is rotated forward, leading to an exaggerated arch in their lower back. This position is inefficient and can cause pain. The posterior pelvic tilt is a simple exercise that reduces that arch and can help you find neutral. Occasionally, I recommend fully posteriorly tilting the pelvis during exercises like dead bugs; however, for the vast majority of people, the goal should be a neutral spine.
Image 1
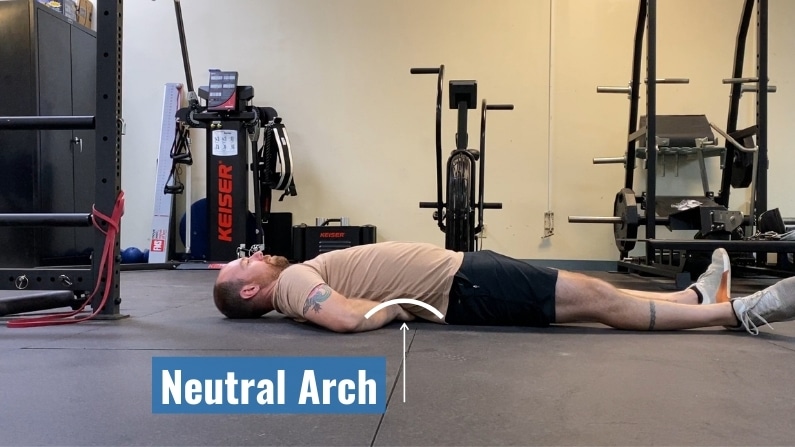
Dead bugs aim to challenge you to maintain the neutral arch in your lower back. When you lie flat, your lower back should have a slight arch, usually just enough to get your hand underneath.
Image 2
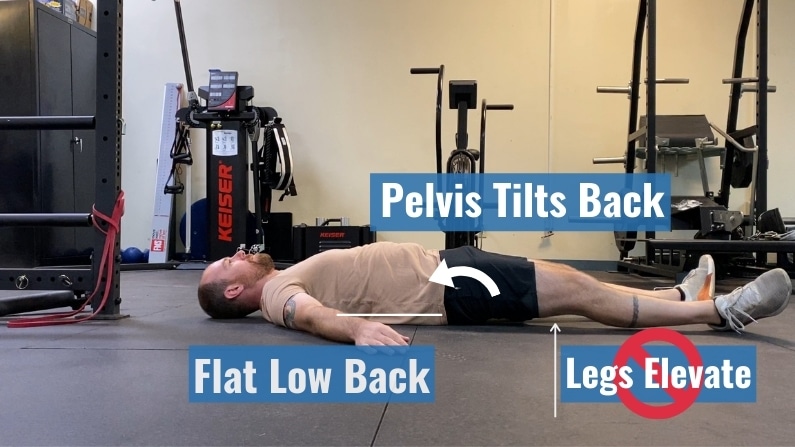
The posterior pelvic tilt to a neutral position is the first step in performing the dead bug. When you successfully tilt your pelvis posteriorly, your lower back should flatten against the ground. Beware that if you have tight hip flexors, your legs may want to elevate when you tilt your pelvis.
Image 3
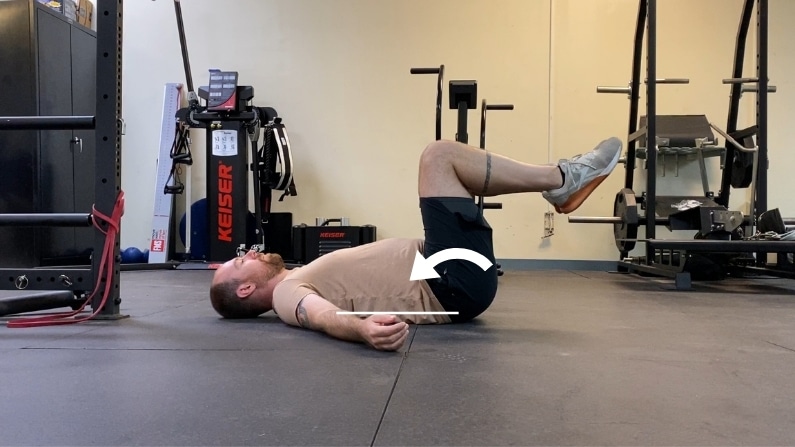
Legs up setup for dead bug exercise progression. By lifting your legs and bringing your knees towards your chest, your pelvis will automatically tilt back. You should be able to do this without elevating your legs as shown in Image 2 before you start to practice dead bugs.
The Vanilla Progression
There is nothing plain about this. If you have never dabbled with dead bugs, we recommend you start here to master bracing and the pelvic tilt. Start with your arms and legs up, knees and hips bent to 90 degrees. Take a belly breath and hold your core tight. Adding movement is where the challenge begins. Try these movements out:
- Move one arm
- Then one leg
- Move both arms together
- Both legs
- Now alternate opposite arm and leg into extension
Your limbs should get as close as possible to the floor without touching and your back should stay neutral through the whole movement.
Assisted or Loaded Dead Bug
This dead bug exercise progression uses external loading to help “activate” your core. It is helpful if you just can’t seem to get it right with the vanilla progression. The progression is simple. You can engage your core by:
- Holding a weight in your hands.
- Pulling a fixed band down.
- Pulling a band apart with your arms.
- Pulling a band apart with your legs.
- Probably a thousand other ways…
The movements are the same but with one small tweak: whichever limbs are activating your core will need to move together, not alternating. For example, if you have bands around your wrists, you won’t be able to move one arm at a time. The version shown is also sometimes called the “anti-extension” dead bug.
Dead Bug Off A Bench
Doing dead bugs from a bench is a great way to train bracing with hip extension. If you sit a lot for work or in your free time, then this exercise will be great for you! Lie down on a bench or table. Set up just like the vanilla dead bug or the assisted/loaded version. But instead of straightening your leg as it descends, keep your knee bent and try to tap your heel to the floor. A few things to keep in mind:
- You can progress this just like any of the other variations.
- If you are struggling with the vanilla version, try it loaded with a kettlebell or dumbbell; you’ll notice a difference.
- You may want to avoid the anti-rotation variant while on a bench… nothing more embarrassing than toppling from a bench while in a busy gym.
Anti-Rotation Dead Bug Progression
This one is similar to the assisted/loaded variation but instead of having a band trying to pull your arms up, it’s pulling your arms to one side. The lateral resistance forces you to stabilize against rotation like a Pallof press. If you are feeling froggy, try this dead bug progression with a band pulling your knees to one side. Progress this exercise by changing the angle and resistance of the band.
Resisted Dead Bug Progressions
Resisted dead bugs follow the vanilla progression but you can add resistance to each limb with dumbbells or ankle weights or by using bands. Adding weight can both help or challenge this movement, depending on how it is applied. In the assisted/loaded progression, the core becomes more active with an applied load. The same is true with this progression, but the biggest difference is that in this case, you are moving the load with your limbs. In the assisted progression, the load is stationary while the other limbs move.
Band Resisted Dead Bugs
Using a light to moderate resistance band changes the resisted dead bug exercise completely. Not better, not worse, but depending on your needs, you may find this more challenging.
Stick Press Dead Bug
By pressing a PVC pipe or broomstick down onto the top of your foot or knee, you create even more tension through the core. I love how deceptive this variation is. It doesn’t look very hard, but I can promise that there is more than meets the eye.
Summary
Once again, this list of dead bug progressions is not comprehensive. I am certain that there are countless other variations out there. But regardless of the uniqueness of the exercise, the most important factor is that it challenges your ability to keep a stable pelvis and spine. You should be able to maintain the spinal position but feel challenged. If you can’t maintain it, then you should regress to a different variation.


